Musician's Friend: Stupid Deal of the Day

Tuesday, June 26, 2012

KG Cymbal Blast Rim


Hi guys! I’m going on vacation tomorrow to sunny San Diego, CA so I am posting this weeks review a little early!
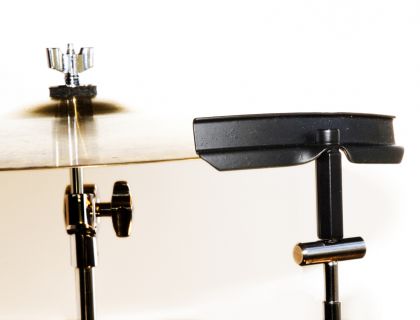
This is for the KG Cymbal Blast Rim. This product is brought to you by the Billdidit, the makers of The Coady Clutch! It’s mainly for the death metal drummers out there but I can see it being used elsewhere. Everyone has heard of the one handed drum roll right? In the metal drumming community it is referred to as the one handed blast beat. It’s a technique that uses the rim of the snare drum as a fulcrum  to play a drum roll/blast beat with one hand. Well, the people at Billdidit asked themselves “How about being able to do that on a cymbal?” And the Cymbal Blast Rim was born.

 Now I don’t have the technical abilities to play one handed rolls/blast beats so I enlisted the help of my friend Matt McKasty, drummer for the brutal metal band Warfear. Below is his unedited review of the product.


“Today I will be reviewing the KG Cymbal Blast Rim made by Billdidit. The KG Cymbal Blast Rim is a product designed to enable a player to apply the freehand technique to one or more of their cymbals as opposed to just their drums. For those of you who don't know what the "freehand technique" is, it is when the player uses the rim of the drum a fulcrum on the center of the stick to get even single strokes with one hand using a see-saw motion. It is also commonly referred to as a "gravity blast". The KG Cymbal Blast Rim represents a small section of counter-hoop just like the one you would find on your drums, which threaded to mount on any standard 8mm cymbal post. When mounted in front of a cymbal it gives you a fulcrum point to execute the technique just as you would on your snare. You can use is on any of your cymbals, but I found it to be intrusive on anything other than the ride cymbal. I can see it being used off to the left of the hats and being played with the left hand as well, but anywhere else it seemed to get in the way of my playing. When positioned in front of the ride cymbal the piece worked surprisingly well. It didn't encumber my ability to play around the kit and it allowed me to play clean one handed rolls on my ride with little effort. I sometimes use my floor tom rim to do this, (which is really only possible because of how low my ride sits in proximity) but having a rim exactly where I need it in front of the cymbal made it much more comfortable and practical. The only issue I ran into with the KG Cymbal Blast Rim is that it must be threaded all the way down onto the post to be stable, so you cannot twist it on the post. This isn't a huge issue being that it is designed to mount on a separate stand which can be rotated in itself, but I used the product on a boom arm that I clamped to my ride stand and it created a small issue, though nothing that can't be solved by the implementation of a small counter-nut on the cymbal post. All in all I have to say the KG Cymbal Blast Rim functions exactly as it was intended to. It may be impractical for some, but the bottom line is it works. If you want to be able to apply the freehand technique to your ride cymbal, but can’t because your ride doesn’t have a rim, this product may very well be the answer.”

The KG Cymbal Blast Rim runs 15.95.

For more info, go to www.billdidit.ca.

Until next time!

Monday, June 25, 2012

Bum Wrap Winner!

Congrats to Chris (Cutaway79)! He's the winner of the Bum Wrap Drum Co wrap!

Friday, June 15, 2012

Bum Wrap Drum Co.


There have been quite a few custom drum wrap companies popping up here and there lately. For a while there was only one that was owned by a well known drummer but now there are quite a few. This review is on one of the newer people coming into the game…or at least the newest one that crossed into my RADAR.
They are called Bum Wrap Drum Company, They are based out of Maryland and sell primarily on ebay. After finding them on ebay I looked to see if they had a Facebook page (who doesn’t have one?) and contacted them for a price list. They returned my email quickly and offered to send me a sample of their wrap. They asked what size I would like and told me they would send it out.  Of course I accepted and waited for my sample to arrive. About a week later it showed up on my doorstep. They actually sent me quite a few samples since I had told them I was going to write this review.

I was very impressed with the wrap samples I got! One of the biggest problems I had with the “original” custom wrap company was that the images on the wrap weren’t always sharp. Some even were slightly blurry, but Bum Wrap’s images are SHARP. They look great and the wrap is sturdy! I’ve ordered wrap off ebay before only to find that it’s about as durable as shelf paper…not something you want to put on a production drum. Bum wrap is maybe slightly thinner than standard wrap but not much. Sorry, I don’t have the specs on their wraps.

Their webpage is www.bumwrapdrumco.com, it has quite a few standard samples but nothing close to what they can do.  I wish they would put some of the samples they sent me on it because they’re pretty impressive. Their Facebook has some additional samples.
So if you’re in the market for affordable custom wrap, I recommend Bum Wrap Drum Co. They can do pretty much anything you can imagine. So check them out and tell them PJ sent ya!

I do have a couple pieces of wrap for a giveaway! I have chosen a couple pieces that I am going to use for drum builds and I have some left over, not that I don’t want to use it, but because I want to help them get their product into other people’s hands. The wrap pieces measure 4.5” x 46” so basically they will work on a 4.5 to 5x14 shell. I am only going to give one piece away at this time, I will do another give away at a later date. Below is the sample that is up for grabs.  To enter into the contest, you must go to their Facebook, www.facebook.com/Bumwrapdrums, and post a positive message on their wall and mention this blog in the post. That will enter you into the drawing!

Here is the piece for the giveaway! It's a really nice wood grain burst!

Good luck!

Monday, May 28, 2012

Stick Gripps


Hello everybody! Today’s review is about StickGripp! I found this company on Facebook and thought I’d ask them if they were interested in a review and lo and behold, they were! So here it is!

First let me say that for years I was an endorser for another grip company that has some great product but it added quite a bit of girth to my sticks, btw, I play 2Bs so it made my sticks feel REALLY big, plus I never got how to install them on my sticks. I would have to send them my sticks to install them for me. Now there is Stick Gripps!

Basically, they are a rubberized sleeve that you place over your stick, they also provide O-rings that go under the grip to help prevent the stick from slipping out of your hand….pretty nifty! How do you install them? Easy. All you need is a heat gun. You position the O-ring where you want it, place the Stickgripp sleeve over the butt end of the stick and use the heat gun to shrink it down to the stick. They are one size fits all! I put one on a 2B stick and another one on a 5B stick and had zero problems! So easy even a drummer can do it!  I know not everyone has a heat gun laying around so I thought I would try using a blow dryer to heat them…not that all drummers have a hair dryer laying around but I knew someone would probably ask…while you CAN do it with a hair dryer, it takes forever to get it hot enough to shrink. A lighter would probably do the job faster.

Options for your Stick Gripps? Oh yes! They come in Black, Red, White, Blue, Green, Purple, Clear and Yellow. They also make them for mallets as well which come in the same colors except clear. You can also get pretty much anything you want printed on them, your name, signature, band name, company name etc. The cool thing about the clear ones is that if you’re a stick endorser,  now you can have a stick grip  that won’t cover up the stick company’s name!

Are they durable? I’ve only had mine a short time so I can’t really attest to their durability but according to their webpage, if they start to come loose, you can reheat them and they will shrink back down tight again.
I’m definitely going to get some more Stick Gripps for myself! They are available at Guitar Center and through their webpage at http://stickgripps.com.

Until next time!

Sunday, May 13, 2012

Twin Cities Drum Shells Revisited!


Ok, this is more of a follow up review for the Twin Cities Custom Drum Shells I did back in December. I have just completed the drum I made with the shell from that review and let me tell you, I LOVE this drum!  Since a picture is worth 1000 words, I figured a picture AND a video would be worth a million so I have posted both a photo of the finished drum and a quick video of how it sounds. Please only pay attention to the sound of the drum and not my playing…


Give Twin Cities some love, they deserve it. They make some incredible shells!

http://www.tcdrumshells.com


Link to video:
http://www.youtube.com/watch?v=4pWIFWdBZSY

Wednesday, May 2, 2012

Joshua Tree Percussion


Joshua Tree Percussion

 This is for the stave drummers out there. For those who don’t know the difference between a ply shell drum and a stave shell drum, here’s a quick lesson. Ply shell drums are made by glue pieces of veneer together (each piece being a “ply”), so when someone says a 10 ply shell, there are 10 pieces of veneer glued together to make the shell. Stave shells are made by taking pieces of wood and gluing them side by side together as would be done in making a barrel and then turned on a lathe to be made round.  There are pros and cons to both methods but since we’re talking staves in this review I will stick with staves.
Pros
Less glue is involved and is localized to just the edge joints where in a ply shell, the glue has to be spread evenly over the entire surface of the veneer.
There is a WIDE range of wood species that can be used because you’re not limited to what is supplied in veneer (I know, there are A LOT of different veneers out there).

Cons
Really, the only one I can think of at this writing is cost. Stave shells are far more expensive than ply shells.

Ok, class is over.
Joshua Tree Percussion was the first stave shell maker I encountered when I started building drums. I have made five snare drums from their shells and the customers who purchased the drums were elated with their purchases.
JTP shells come in MANY, MANY, MANY different species and they are constantly adding more. AS of this writing, here is what they offer:  Rock Maple, Soft Maple, Red Oak, White Oak, Birch, Beech, Ash, Pecan/Hickory, Phillippine Mahogany, Cherry, Black Walnut, Purpleheart, Yellowheart (Pau Amarillo), Figured Soft Maple, Figured Birch, African Mahogany, Padauk, Bubinga, Birdseye Maple, Jatoba, Wenge, Honduran Mahogany, Lacewood, Peruvian Walnut, Sapele, Zebrawood, Quilted Maple, Jarrah, Cocobolo, Chechen, Bocote, Bloodwood, Cumaru (Brazilian Teak), Teak, Canarywood, Macassar Ebony, Gabon Ebony, Asian Striped Ebony, African Blackwood, and Koa.  The species are categorized by price, with prices ranging from $100 for a 3x13 to $475 for a 7x14. These prices are for raw shells.
Their webpage is very helpful and informative. They even have the Janka Scale (measures the hardness of wood) on their page as well as suggestions to think of while designing your drums. They also carry tube lugs , hoops, throw offs and anything else you need for one stop shopping!
These guys have been around quite a while and make a sound product! Below are the four drums that I have built from their shells.

6x14 Mahogany Stave 


5x14 Oak Stave


7x13 Oak Stave


3x14 Walnut Stave


7x13 Quilted Oak Stave


So if you’re looking for something different, try a stave shell and I suggest Joshua Tree Percussion. There are a lot of different stave shell makers nowadays and most of them are pretty good but JTP has been doing it for a LONG time! They’re the first ones I think of when I do a stave!